Friday, July 6, 2012

c# readonly vs constant in different assembly

In C#/.NET we can declare a constant value by either using keyword 'const' or 'readonly' . Using const keyword will define compile time constant and readonly will define runtime. Only the C# built-in types can be declared using 'const' for user-defined types like class, struct or array use 'readonly'. Compiler will have a literal value for all the fields that declared const, so if you decompile the code you will find no reference to the constant but actual value. Compile time constant are faster then readonly but are less flexible and can create issues if not used properly. As a general rule one should strictly use compile time constant only for values that are never going to change for example defining value of PI, any value that might change in future use readonly.

During developing a large application there are numerous scenario where you might have to choose between compile-time and run-time constant's. Compile time constants are faster then run-time, although in certain conditions to avoid potential problems you might want to consider using run-time constants . The difference between the two is more clearly explained in this post [ linky ]

Here is an practical example, two teams are working on a same project one team develops a external class library and other team develops the main application. Team one has developed the class library that has some const and readonly variables, these values are consumed in the application developed by the team two. If in future team one updates the constant value in the external class library and the application is not recompiled it would not reflect the new value. This issue is only created if your are using constant values form external assemblies. If a const value changes in a assembly then you need to rebuild all the clients applications dependent on it.


   1:  using System;
   2:  using ExternalLibrary;
   3:   
   4:  namespace ExternalLibrary
   5:  {
   6:      public class ConstantLib
   7:      {
   8:          public static readonly int StartValue = 105;
   9:          public const int EndValue = 120;
  10:          public readonly int ReadonlyValue = 555;
  11:      }
  12:  }
  13:   
  14:   
  15:   
  16:  namespace CTvsRT
  17:  {
  18:     class Program
  19:     {
  20:        static void Main(string[] args)
  21:        {
  22:         ConstantLib cl = new ConstantLib();
  23:   
  24:         Console.WriteLine("ConstantLib.StartValue {0}", ConstantLib.StartValue.ToString());
  25:         Console.WriteLine("ConstantLib.EndValue {0}", ConstantLib.EndValue.ToString());
  26:         Console.WriteLine("ConstantLib.readonlyValue {0}", cl.ReadonlyValue.ToString());
  27:   
  28:         Console.Read();
  29:        }
  30:     }
  31:  }

Friday, January 13, 2012

Visual Studio Templates for Silverlight

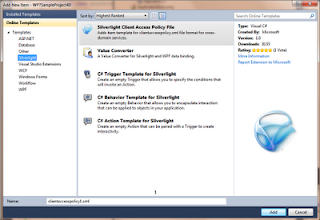
For Visual Studio and Silverlight there are nice templates available online. If you are a new developers this templates will be very useful, also for experience developers they should be a handy tool in their toolbox. In this post we will learn how to install the project item templates and use them. I assume every .NET developer should have used the inbuilt visual studio template's and understand how helpful they can be.

The five template are :-
1) Silverlight Client Access Policy File:-
This templates adds a file named clientaccesspolicy.xml in the root folder of the Silverlight project.Silverlight 4 supports two different mechanisms for services to enable cross-domain access clientaccesspolicy.xml or crossdomain.xml file. This file need to be at the root of the domain where the service is hosted, I tend to use clientaccesspolicy.xml file because it provides more granular control over allowed domains and can also be used to set configuration for Sockets.A very good explanation can be found here http://www.devtoolshed.com/explanation-cross-domain-and-client-access-policy-files-silverlight

Either way, when you are done  the policy file needs to go in the ROOT of the domain. This is important as it is not the application root, but the root web. Even if your app is located at   foo.com/myapp, the policy file needs to be at  foo.com/clientaccesspolicy.xml.

2) Value Converter:-
This templates adds a file for converter.

3) C# Trigger Template for Silverlight:-
This templates adds a file for trigger.

4) C# Behavior Template for Silverlight:-
This templates adds a file for behavior.

5) C# Action Template for Silverlight:-
This templates adds a file for action.

How to get the templates ?
Open Visual Studio, open an existing silverlight project or create new one.
Right click on the Silverlight Project –> Add -> New Item ->(left side) select Online Templates -> Silverlight


Organizing the templates
This templates will create files and place them under the root folder. What I do is usually create folders in the silverlight project named as behaviors,triggers,actions,converters. How this helps? eventually and gradually when the projects files increase its easy to locate code-files and manage them effectively.

Code Snippets
I know there are code snippets available for the same, I like the templates because a single click will generate the file with basic code and it opens the popular open-file dialog where you can name the file.