Showing posts with label Silverlight. Show all posts

Tuesday, May 27, 2014

Decompiling BAML

We know that XAML is a declarative markup language. XAML simplifies creating a UI for .NET application created using WPF or Silverlight. It is simple and easy to create UI elements using XAML, and then separate the design from run-time logic by using code-behind files, joined to the markup by partial class definitions. So what is a BAML ?

BAML is the short form of Binary Application Markup Language, as the name implies it is a binary representation of the XAML file containing implementation details. It is nothing but  parsed, tokenism and XAML that is converted into binary format. Tokenized  means lengthier bits of XAML are replaced with shorter tokens. It is compressed declarative format that is faster to load and parse also it is smaller in size as compared to regular XAML.

So when you compile a WPF project, all XAML files whose build action are set to Page or Resource gets converted to BAML and then embedded as resource in the assembly. So now you have a binary object that is smaller and also optimized in a way that makes it faster to parse at runtime. BAML gets embedded as a resource so developer don't need to worry about linking,parsing or referencing anything  except calling InitializeComponent() in code-behind.

BAML is converted to implementation code during runtime, internally it is used for creating objects. If  you set the x:shared attribute to false, a new copy is created from the BAML every time you use the object. In earlier versions developers didn't have access to BAML, After WPF 4 the new implementation of XamlReader.Load(), BAML loading, Control & DataTemplates functionality with a new engine built on top of the new System.Xaml.dll, I know back in the early days of WPF that CAML was generated rather than BAML, looks like the WPF team has decided to eliminate it, and keep the BAML version.

Baml2006Reader :
Again as most of us know that in WPF, UI can be created either by code or by XAML-which is basically an declarative XML to describe object graphs. This approach makes UI development  easy and fast but parsing XAML file at runtime is quite expensive. So the MarkupCompiler converts the XAML file to BAML.The BAML API is something unique of WPF and was not public until .NET 4.0. Now it's available through the Baml2006Reader implementation. The following code shows how to load a BAML stream .Baml2006Reader uses Reflection to load the assemblies needed for decompilation, which is a little expensive.
var reader = new Baml2006Reader(stream);
var writer = new XamlObjectWriter(reader.SchemaContext);
while(reader.Read())
{
    writer.WriteNode(reader);
}
return writer.Result;
A simple way to decompile the generated BAML is by using the dotPeek from JetBrains or .NET Reflector. Lets walk through the process of installing the plugin.

dotPeek : We have to build and install a plugin for dotPeek. To install the plugin follow this steps.
  1. Download the addin Baml4dotPeek  from the github project https://github.com/cprieto/Baml4dotPeek
  2. Build the project, you might have to update reference to point to your dotPeek bin folder.
  3. A successful  build will generate a output file "BamlFromResource.dll".
  4. Copy this file to the dotpeek bin directory.
  5. Restart dotPeek, and verify form the Tools|Options, if you have the BamlDecompiler.


Once you have the plugin installed open any WFP project and expand the directory tree to find the resources . From the resources you will find some baml file, select any file and the window on the right will display the xaml for that resource.


Note: For Silverlight the XAML files are not converted in to BAML.When you build a Silverlight project a .xap file is created, it is just a .zip-file containing an AppManifest.XAML and all resources in your project compiled as dll's.  You can verify that by opening a dll in dotPeek or Reflector, it will show the XAML-files and other resources.
Friday, January 13, 2012

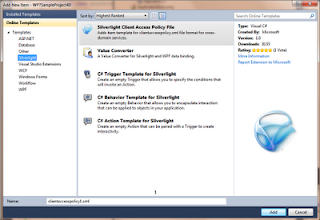
Visual Studio Templates for Silverlight

For Visual Studio and Silverlight there are nice templates available online. If you are a new developers this templates will be very useful, also for experience developers they should be a handy tool in their toolbox. In this post we will learn how to install the project item templates and use them. I assume every .NET developer should have used the inbuilt visual studio template's and understand how helpful they can be.

The five template are :-
1) Silverlight Client Access Policy File:-
This templates adds a file named clientaccesspolicy.xml in the root folder of the Silverlight project.Silverlight 4 supports two different mechanisms for services to enable cross-domain access clientaccesspolicy.xml or crossdomain.xml file. This file need to be at the root of the domain where the service is hosted, I tend to use clientaccesspolicy.xml file because it provides more granular control over allowed domains and can also be used to set configuration for Sockets.A very good explanation can be found here http://www.devtoolshed.com/explanation-cross-domain-and-client-access-policy-files-silverlight

Either way, when you are done  the policy file needs to go in the ROOT of the domain. This is important as it is not the application root, but the root web. Even if your app is located at   foo.com/myapp, the policy file needs to be at  foo.com/clientaccesspolicy.xml.

2) Value Converter:-
This templates adds a file for converter.

3) C# Trigger Template for Silverlight:-
This templates adds a file for trigger.

4) C# Behavior Template for Silverlight:-
This templates adds a file for behavior.

5) C# Action Template for Silverlight:-
This templates adds a file for action.

How to get the templates ?
Open Visual Studio, open an existing silverlight project or create new one.
Right click on the Silverlight Project –> Add -> New Item ->(left side) select Online Templates -> Silverlight


Organizing the templates
This templates will create files and place them under the root folder. What I do is usually create folders in the silverlight project named as behaviors,triggers,actions,converters. How this helps? eventually and gradually when the projects files increase its easy to locate code-files and manage them effectively.

Code Snippets
I know there are code snippets available for the same, I like the templates because a single click will generate the file with basic code and it opens the popular open-file dialog where you can name the file.


Sunday, October 30, 2011

Silverlight Cookie Manager

Cookies are popular in web programming for state management, mostly used for persisting small data on client computer. Each cookie is a name-value pairs, this information is stored as small files on client hard-disk. You can also set expiration  date and time of a cookie. If no expiration is provided cookie will be discarded when user closes the browser, this type of non-persistent cookies is useful to store secure or short time data.

In Silverlight, one can access cookies through the 'HtmlPage' class. This class provides browser functionalities and other details like Cookie data, Browser name and version, Popup Window, Platform, UserAgent, Product name and version.  Below is a diagram illustrating how the Silverlight plug-in access cookies through the browser. In traditional web programming, the Response Object or java script is used to set a cookie. A user can disable cookies on his browser, so while using the response object  we should check if cookies are enabled or not. To verify if cookies are enabled, set a cookie and try to read it back, if you can't read it means cookies are disabled. Silverlight code executes on client PC, so we can directly check if cookies are enabled or not just by using 'HtmlPage.BrowserInformation.CookiesEnabled'.


Securing cookie data is very important and should be take in account during application design. To prevent unauthorized access of cookies, combination of tricks can be used like encryption, expiration time, HttpOnly,etc. Silverlight code executes on client PC and cannot access HttpOnly cookies. Cookie class is a part of 'System.Net' and is used to retrieve information about cookies that are received with Http responses. Cookies are stored in a CookieContainer on a Web request, and a CookieCollection on a Web response. You must always create a CookieContainer to send with a request if you want cookies to be returned on the response, also for HTTPOnly cookies.

Limitation if a cookie is that it can store only string data types.
1) Some user may disable cookies on their browser in some case user may manually delete cookies
2) Size limitations Most browsers place a 4096-byte limit on the size of a cookie, although support for 8192-byte cookies is becoming more common in newer browser and client-device versions.
3) User-configured refusal Some users disable their browser or client device's ability to receive cookies, thereby limiting this functionality.
4) Potential security risks Cookies are subject to tampering. Users can manipulate cookies on their computer, which can potentially cause a security risk.

I have created a simple class that aggregates common functionality related to cookies. All members in the class are static so there is no need to create new instances every time you read or write a cookie. The overloaded method SetCookie() will create a new cookie or reset the value of an existing cookie, you can also set the expiration time, path, domain, security using the same method. GetAllCookieList() method will return a list of all available cookies. DeleteCookie() method will delete the cookie by setting the expiration time to yesterday. GetCookieAsString() will return the full cookie data as a string.

  1. using System;
  2. using System.Net;
  3. using System.Text;
  4. using System.Linq;
  5. using System.Collections.Generic;
  6. using System.Windows.Browser;
  7.  
  8. namespace Utilities
  9. {
  10.     public static class CookieManager
  11.     {
  12.         // 1) If same name cooke exist, SetCookie() will over-ride value.
  13.         // 2) Exception handling should be done in user code
  14.         // 3) - expireDays = 0, indicates a session cookie that will not be written to disk
  15.         //    - expireDays = -1, indicates that the cookie will not expire and will be permanent
  16.         //    - expireDays = n, indicates that the cookie will expire in n days
  17.  
  18.  
  19.         public static bool IsCookieEnabled()
  20.         {
  21.             return HtmlPage.BrowserInformation.CookiesEnabled;
  22.         }
  23.  
  24.         public static bool SetCookie(string key, string value)
  25.         {
  26.             return SetCookie(key, value, null, null, null, false);
  27.         }
  28.  
  29.         public static bool SetCookie(string key, string value, TimeSpan? expiry)
  30.         {
  31.             return SetCookie(key, value, expiry, null, null, false);
  32.         }
  33.  
  34.         public static bool SetCookie(string key, string value, TimeSpan? expiry, string path, string domain, bool secure)
  35.         {
  36.             if (!IsCookieEnabled()) return false; //If cookies not enabled return false.
  37.  
  38.             StringBuilder sbCookie = new StringBuilder();
  39.             sbCookie.Append(string.Concat(key, "=", value));
  40.  
  41.             if (expiry.HasValue)
  42.             {
  43.                 DateTime expire = DateTime.UtcNow + expiry.Value; sbCookie.Append(string.Concat(";expires=", expire.ToString("R")));
  44.             }
  45.  
  46.             if (path != null)
  47.             {
  48.                 sbCookie.Append(string.Concat(";path=", path));
  49.             }
  50.  
  51.             if (domain != null)
  52.             {
  53.                 sbCookie.Append(string.Concat(";domain=", domain));
  54.             }
  55.  
  56.             if (secure)
  57.             {
  58.                 sbCookie.Append(";secure");
  59.             }
  60.  
  61.             HtmlPage.Document.SetProperty("cookie", sbCookie.ToString());  // User should handle exceptions if any while writing cookie.
  62.  
  63.             return true;
  64.         }
  65.  
  66.         public static List<Cookie> GetAllCookieList()
  67.         {
  68.             string[] cookies = HtmlPage.Document.Cookies.Split(';');
  69.             List<Cookie> cookieList = new List<Cookie>();
  70.             foreach (string cookie in cookies)
  71.             {
  72.                 string[] cookieParts = cookie.Split('=');
  73.                 if (cookieParts.Count() >= 1)
  74.                 {
  75.                     cookieList.Add(new Cookie(cookieParts[0].Trim(), cookieParts[1].Trim()));
  76.                 }
  77.             }
  78.  
  79.             return cookieList; //User should check for count to know how many cookies are retrieved.
  80.  
  81.             ////LINQ code
  82.             //return (from cookie in cookies
  83.             //        select cookie.Split('=')
  84.             //            into cookieParts
  85.             //            where cookieParts.Count() >= 1
  86.             //            select new Cookie(cookieParts[0].Trim(), cookieParts[1].Trim())).ToList(); //User should check for count to know how many cookeies are retrieved.
  87.         }
  88.  
  89.         public static CookieCollection GetAllCookieCollection()
  90.         {
  91.             string[] cookies = HtmlPage.Document.Cookies.Split(';');
  92.             CookieCollection cookieCollection = new CookieCollection();
  93.             foreach (string cookie in cookies)
  94.             {
  95.                 string[] cookieParts = cookie.Split('=');
  96.                 if (cookieParts.Count() >= 1)
  97.                 {
  98.                     cookieCollection.Add(new Cookie(cookieParts[0].Trim(), cookieParts[1].Trim()));
  99.                 }
  100.             }
  101.             return cookieCollection; //User should check for count to know how many cookies are retrieved.
  102.  
  103.             //LINQ code
  104.             //foreach (string[] cookieParts in
  105.             //   cookies.Select(cookie => cookie.Split('=')).Where(cookieParts => cookieParts.Count() >= 1))
  106.             //{
  107.             //    cookieCollection.Add(new Cookie(cookieParts[0].Trim(), cookieParts[1].Trim()));
  108.             //}
  109.             //return cookieCollection; //User should check for count to know how many cookies are retrieved.
  110.         }
  111.  
  112.         public static string GetCookieAsString(string key)
  113.         {
  114.             string[] cookies = HtmlPage.Document.Cookies.Split(';');
  115.  
  116.             foreach (string cookie in cookies)
  117.             {
  118.                 string[] keyValue = cookie.Split('=');
  119.  
  120.                 if (keyValue.Length == 2)
  121.                 {
  122.                     if (keyValue[0].ToString().Trim() == key) //sometime we get one space infront of the cookie so need to Trim()
  123.                     {
  124.                         return cookie;
  125.                     }
  126.                 }
  127.             }
  128.             return null;
  129.             //LINQ code
  130.             //return (from cookie in cookies
  131.             //        let keyValue = cookie.Split('=')
  132.             //        where keyValue.Length == 2
  133.             //        where keyValue[0].ToString().Trim() == key
  134.             //        select cookie).FirstOrDefault();
  135.         }
  136.  
  137.         public static string GetValue(string key)
  138.         {
  139.             string[] cookies = HtmlPage.Document.Cookies.Split(';');
  140.  
  141.             foreach (string cookie in cookies)
  142.             {
  143.                 string[] keyValue = cookie.Split('=');
  144.  
  145.                 if (keyValue.Length == 2)
  146.                 {
  147.                     if (keyValue[0].ToString().Trim() == key) //sometime we get one space infront of the cookie so need to Trim()
  148.                     {
  149.                         return keyValue[1]; //this will return only Value                        
  150.                     }
  151.                 }
  152.             }
  153.  
  154.             return null;
  155.             //LINQ code
  156.             //return (from cookie in cookies
  157.             //        select cookie.Split('=')
  158.             //            into keyValue
  159.             //            where keyValue.Length == 2
  160.             //            where keyValue[0].ToString().Trim() == key
  161.             //            select keyValue[1]).FirstOrDefault();
  162.         }
  163.  
  164.         public static bool DeletCookie(string key)
  165.         {
  166.  
  167.             if (Exists(key, ""))// check if cookie is present or not
  168.             {
  169.                 DateTime expireDate = DateTime.Now - TimeSpan.FromDays(1); // yesterday
  170.                 string expires = ";expires=" + expireDate.ToString("R");
  171.                 string cookie = key + "=" + expires;
  172.                 HtmlPage.Document.SetProperty("cookie", cookie);
  173.                 return true;
  174.             }
  175.             else
  176.             {
  177.                 return false;
  178.             }
  179.         }
  180.  
  181.         public static bool Exists(string key, string value)
  182.         {
  183.             if (string.IsNullOrEmpty(key))
  184.                 return false; //If key not provided, return false
  185.  
  186.             return string.IsNullOrEmpty(value)
  187.                        ? HtmlPage.Document.Cookies.Contains(key + "=")
  188.                        : HtmlPage.Document.Cookies.Contains(key + "=" + value);
  189.         }
  190.  
  191.     }
  192. }


Cookie FAQ
http://www.cookiecentral.com/faq/

Silverlight cookies
http://msdn.microsoft.com/en-us/library/dd920298%28v=VS.95%29.aspx

HttpOnly cookies
http://msdn.microsoft.com/en-us/library/system.web.httpcookie.httponly.aspx

Wednesday, February 9, 2011

Silverlight double click event

We had to perform some business logic when a user double click’s on a Image, unfortunately till the current version of silverilght( version 4.x) there is no double click event. In future versions of silverlight we might get the double click functionality but for right now we will have to get this done by our self. So how do we implement double click event? The trick is to start a timer and check if the MouseLeftButtonDown event is fired again in certain duration(milliseconds).

Code is very simple and short, In the xaml we have a Image with a MouseLeftButtonDown event in the code behind we add a dispatch timer which is a part of  System.Windows.Threading. On the first click start the timer, when next click event is fired check if the timer is active, if the timer is active then it is a double click so go ahead and perform the intended action.

  1.    private DispatcherTimer timer;
  2.    public MainPage()
  3.    {
  4.        InitializeComponent();
  5.        timer = new DispatcherTimer();
  6.        timer.Interval = new TimeSpan(0, 0, 0, 200);
  7.        timer.Tick += new EventHandler(( sender,  e) => { timer.Stop(); });
  8.    }
  9.  
  10.    private void Image_MouseLeftButtonDown(object sender, MouseButtonEventArgs e)
  11.    {
  12.        if (!timer.IsEnabled)
  13.        {
  14.            timer.Start();return;
  15.        }
  16.        timer.Stop();
  17.        HandleDoubleClick();
  18.    }


DoubleClick Class
The above functionality can be encapsulated in a class for a cleaner looking code. The class ‘DoubleClick’ has a dispatch timer and a public event. In the constructor you pass the UIElement as parameter and hook the MouseLeftButtonDown event. The timer tick event has an inline event handler defined that will stop the timer on the first tick.

  1. namespace DoubleClickInSL4
  2. {
  3.     using System.Windows.Threading;
  4.     public class DoubleClick
  5.     {
  6.         private const int dblclickDelay = 200;
  7.         private DispatcherTimer timer;
  8.         public event MouseButtonEventHandler MouseDoubleClick;
  9.  
  10.         public DoubleClick(UIElement uiElement)
  11.         {
  12.             timer = new DispatcherTimer();
  13.             timer.Interval = new TimeSpan(0, 0, 0, dblclickDelay);
  14.             timer.Tick += new EventHandler((sender, e) => { timer.Stop(); });
  15.  
  16.             uiElement.MouseLeftButtonDown += new MouseButtonEventHandler(UIElement_MouseLeftButtonDown);
  17.         }
  18.  
  19.         private void UIElement_MouseLeftButtonDown(object sender, MouseButtonEventArgs e)
  20.         {
  21.             if (!timer.IsEnabled)
  22.             {
  23.                 timer.Start();
  24.                 return;
  25.             }
  26.             timer.Stop();
  27.  
  28.             //HandleDoubleClick();
  29.             if (MouseDoubleClick != null)
  30.             {
  31.                 MouseDoubleClick(sender, e);
  32.             }
  33.         }
  34.     }
  35. }


Rx Framework
A very interesting use of the Rx framework can simplify the above code to just couple of lines. In the MouseLeftButtonDown event we add a Observable.FromEvent  and set TimeInterval, so when the event is fired for the first time the timer starts. On the second event the code in the body of lambda will be executed which checks if  duration is greater then 300.

  1. private void Image_MouseLeftButtonDown(object sender, MouseButtonEventArgs e)
  2. {           
  3.    Observable.FromEvent<MouseButtonEventArgs>(this.LayoutRoot, "MouseLeftButtonDown").TimeInterval().Subscribe(evt =>
  4.     {
  5.         if (evt.Interval.Milliseconds >= 300)
  6.         {
  7.             // Do something on double click
  8.         }
  9.     });
  10. }


Doubleclick Behaviour
The above code is helpful for application that handles the logic directly in the codebehind, so how about MVVM application where the application logic is handled in the model view. A decent solution for such a scenario would be to write a behavior that implements the double click functionality. There are many posts which explain how to create a behaviors so I will not go in details, basically this double click behavior have a dependency property named as DoubleClickCommand that will bind to a property in the view model of type ICommand. I created a class called as DelegateCommand which implements the interface ICommand, this class will be instantiated in the view model and assigned to view models property. 

  1. namespace DoubleClickInSL4
  2. {
  3.     using System.Windows.Threading;
  4.     public class DoubleClickBehavior : Behavior<UIElement>
  5.     {
  6.         private const int dblclickDelay = 200;
  7.         private DispatcherTimer timer;
  8.  
  9.         public object CommandParameter
  10.         {
  11.             get { return (object)GetValue(CommandParameterProperty); }
  12.             set { SetValue(CommandParameterProperty, value); }
  13.         }
  14.         public ICommand DoubleClickCommand
  15.         {
  16.             get { return (ICommand)GetValue(DoubleClickCommandProperty); }
  17.             set { SetValue(DoubleClickCommandProperty, value); }
  18.         }
  19.  
  20.         public static readonly DependencyProperty CommandParameterProperty = DependencyProperty.Register
  21.             ("CommandParameter", typeof(object), typeof(DoubleClickBehavior), new PropertyMetadata(CommandParameterChanged));
  22.         private static void CommandParameterChanged(DependencyObject d, DependencyPropertyChangedEventArgs e) { }
  23.  
  24.         public static readonly DependencyProperty DoubleClickCommandProperty = DependencyProperty.Register
  25.             ("DoubleClickCommand", typeof(ICommand), typeof(DoubleClickBehavior), new PropertyMetadata(DoubleClickCommandChanged));
  26.         private static void DoubleClickCommandChanged(DependencyObject d, DependencyPropertyChangedEventArgs e) { }
  27.  
  28.         public DoubleClickBehavior()
  29.         {
  30.             timer = new DispatcherTimer();
  31.             timer.Interval = new TimeSpan(0,0, 0, 0, dblclickDelay);
  32.             timer.Tick += new EventHandler((sender, e) =>
  33.             { timer.Stop(); });
  34.         }
  35.         protected override void OnAttached()
  36.         {
  37.             base.OnAttached();
  38.             AssociatedObject.MouseLeftButtonDown += UIElement_MouseLeftButtonDown;
  39.         }
  40.         protected override void OnDetaching()
  41.         {
  42.             base.OnDetaching();
  43.             AssociatedObject.MouseLeftButtonDown -= UIElement_MouseLeftButtonDown;
  44.         }
  45.  
  46.         private void UIElement_MouseLeftButtonDown(object sender, MouseButtonEventArgs e)
  47.         {
  48.             if (!timer.IsEnabled)
  49.             {
  50.                 timer.Start();
  51.                 return;
  52.             }
  53.             timer.Stop();
  54.  
  55.             //HandleDoubleClick();
  56.             if (CommandParameter != null)
  57.                 DoubleClickCommand.Execute(CommandParameter);
  58.         }
  59.     }
  60. }
  61.  
  62. namespace DoubleClickInSL4
  63. {
  64.      public class DelegateCommand : ICommand   
  65.      {   
  66.          Func<object, bool> canExecute;   
  67.          Action<object> executeAction;   
  68.          bool canExecuteCache;   
  69.          public DelegateCommand(Action<object> executeAction, Func<object, bool> canExecute)  
  70.          {  
  71.              this.executeAction = executeAction;
  72.              this.canExecute = canExecute;
  73.          }  
  74.          #region ICommand Members  
  75.          public bool CanExecute(object parameter)  
  76.          {  
  77.              bool temp = canExecute(parameter);
  78.              if (canExecuteCache != temp)
  79.              {  
  80.                  canExecuteCache = temp;
  81.                  if (CanExecuteChanged != null)
  82.                  {  
  83.                      CanExecuteChanged(this, new EventArgs());
  84.                  }  
  85.              }  
  86.              return canExecuteCache;
  87.          }  
  88.          public event EventHandler CanExecuteChanged;  
  89.          public void Execute(object parameter)  
  90.          {  
  91.              executeAction(parameter);
  92.          }  
  93.            #endregion
  94.      }
  95. }

Here is the code for the MainPage.xaml.cs

  1. using System;
  2. using System.Collections.Generic;
  3. using System.Windows;
  4. using System.Windows.Controls;
  5. using System.Windows.Documents;
  6. using System.Windows.Input;
  7. using System.Windows.Threading;
  8. using System.Windows.Interactivity;
  9.  
  10. namespace DoubleClickInSL4
  11. {    
  12.     public class myViewModel
  13.     {
  14.         public ICommand DoubleCommand { get; set; }
  15.         public myViewModel()
  16.         {
  17.             DoubleCommand = new DelegateCommand(myAction, canExe);
  18.         }     
  19.         private void myAction(object param)
  20.         { //Write your action here }
  21.         private bool canExe(object param)
  22.         { return true; }
  23.     }
  24.  
  25.     public partial class MainPage : UserControl
  26.     {      
  27.         public MainPage()
  28.         {
  29.             InitializeComponent();
  30.             Image.DataContext = new myViewModel();
  31.         }
  32.     }
  33. }
 

Here is the xaml for the MainPage.xaml.

  1. <UserControl x:Class="DoubleClickInSL4.MainPage"
  2.     xmlns="http://schemas.microsoft.com/winfx/2006/xaml/presentation"
  3.     xmlns:x="http://schemas.microsoft.com/winfx/2006/xaml"
  4.     xmlns:d="http://schemas.microsoft.com/expression/blend/2008"
  5.     xmlns:mc="http://schemas.openxmlformats.org/markup-compatibility/2006"
  6.     xmlns:i="http://schemas.microsoft.com/expression/2010/interactivity"
  7.     xmlns:Local="clr-namespace:DoubleClickInSL4"
  8.     mc:Ignorable="d" d:DesignHeight="300" d:DesignWidth="400">
  9.     <UserControl.Resources>
  10.         <Local:myViewModel x:Name="vm"/>
  11.     </UserControl.Resources>
  12.     <Grid x:Name="LayoutRoot" Background="White" Height="300" Width="400">
  13.         <Image x:Name="Image" Source="Images/80_20.jpg" >
  14.             <i:Interaction.Behaviors>
  15.                                 <Local:DoubleClickBehavior DoubleClickCommand="{Binding DoubleCommand}" CommandParameter="{Binding ElementName=Image,Path=Source}"/>
  16.             </i:Interaction.Behaviors>
  17.                                </Image>
  18.     </Grid>
  19. </UserControl>


Extending Silverlight mouse events


SharpGIS has a very interesting blog post about extending the silverlight mouse events. Including double-clicks they have provided many more extensions with source code and a online demo.
http://www.sharpgis.net/post/2009/05/02/Extending-Silverlighte28099s-mouse-events.aspx

Wednesday, February 2, 2011

Exam 70-506 ( TS: Silverlight 4, Development )

 
In November I gave the beta exam for silverlight 4, it took me more then four hours to complete the exam questions, review and comment. For beta exams you do not get the score right away, exactly after three months I got an email from Microsoft stating that I passed the beta exam for silverlight  and now I am certified Silverlight 4,Developer.

Silverlight exam is now released and is available through prometric testing centers and the exam number is 70-506. I like  beta exams because they are challenging, one reason is you don't get ready made material to study all you have is MSDN documents, blogs,some samples and forums. There is a huge community support for silverlight and luckily there where some good books in the market. I find many of my fellow programmers worried about not able to find definite material to prepare for the exam. I am going to put together a list of  useful links that will help to prepare for the exam.

Exam details on Microsoft learning.
http://www.microsoft.com/learning/en/us/Exam.aspx?ID=70-506&Locale=en-us#tab2

Some good books
Professional Silverlight 4
Silverlight 4 in Action
Pro Silverlight for the Enterprise
Microsoft Silverlight 4 Data and Services Cookbook

Forums
http://forums.silverlight.net
http://social.msdn.microsoft.com/Forums/eu/silverlightdeveloper/threads

Links

Silverlight Show Getting ready for silverlight exam 70-506
http://www.silverlightshow.net/items/Getting-ready-for-the-exams-Part-1.aspx
http://www.silverlightshow.net/items/Getting-ready-for-Microsoft-Silverlight-Exam-70-506-Part-2.aspx
http://www.silverlightshow.net/items/Getting-ready-for-Microsoft-Silverlight-Exam-70-506-Part-3.aspx
http://www.silverlightshow.net/items/Getting-ready-for-Microsoft-Silverlight-Exam-70-506-Part-4.aspx
http://www.silverlightshow.net/items/Getting-ready-for-Microsoft-Silverlight-Exam-70-506-Part-5.aspx
http://www.silverlightshow.net/items/Getting-ready-for-Microsoft-Silverlight-Exam-70-506-Part-6.aspx
http://www.silverlightshow.net/items/Getting-ready-for-Microsoft-Silverlight-Exam-70-506-Part-7.aspx

Mark’s Blog
http://mark.mymonster.nl/2010/10/25/exam-preparationsilverlight-4-development70-506part-1/
http://mark.mymonster.nl/2010/10/26/exam-preparationsilverlight-4-development70-506part-2/
http://mark.mymonster.nl/2010/10/31/exam-preparationsilverlight-4-development70-506part-3/
http://mark.mymonster.nl/2010/11/01/exam-preparationsilverlight-4-development70-506part-4/
http://mark.mymonster.nl/2010/11/02/exam-preparationsilverlight-4-development70-506part-5/
http://mark.mymonster.nl/2010/11/03/exam-preparationsilverlight-4-development70-506part-6/
http://mark.mymonster.nl/2010/11/04/exam-preparationsilverlight-4-development70-506part-7/

Microsoft training catalog
http://learning.microsoft.com/Manager/Catalog.aspx?qry=silverlight&nav=0&btn=1

Silverlight Documents on MSDN
http://msdn.microsoft.com/en-us/library/cc838158(VS.95).aspx

Silverlight 4 Hands On Labs
http://www.silverlight.net/learn/handsonlabs/

List of all popular books
http://www.silverlight.net/learn/books/

Chanel 9 - What's New in Silverlight 4
http://channel9.msdn.com/Learn/Courses/Silverlight4/Overview

Videos and screen cast
http://www.silverlight.net/learn/videos/all/
http://blogs.msdn.com/b/joestagner/archive/2008/08/01/44-silverlight-videos.aspx
http://sandrinodimattia.net/blog/post/Complete-Expression-Blend-and-Silverlight-5-day-OnRamp-training-course-All-videos-all-assets-download-packages-in-one-place.aspx


For developers having right experience the exams are not really tough but I would say the questions are tricky so make sure you have good hands-on experience with silverlight before you appear for the exam. Although the exam focuses on sivlerlight 4, I would say Visual Studio 2010 and Expression Blend are inevitable tools for a silverlight developer. I have tried to put together some of the good links, if you find some more good links please put them in the comments

Wednesday, December 22, 2010

Performance Wizard for Silverlight

 
Microsoft has released the first service pack for Visual studio 2010, although the service pack is marked as beta it comes with a “go live” license. Along with it two other service packs are released Team Foundation Server 2010 SP1 Beta and .NET 4.0 SP1 Beta. For Silverlight developers they have packed two update in the Visual studio 2010 SP1 Beta.

1) Silverlight 4 tools for Visual Studio 2010 : “The Silverlight 4 tools are now included along with Silverlight 3 support”, all it means that you will not have to install Silverlight 4 tools separately.

2) Performance Wizard for Silverlight : This will enable the users to profile the silverlight application performance directly through visual studio, user can create profiling reports and save them.

You can get the download links from Brian blog, he has nicely detailed all important updates in the service packs
http://blogs.msdn.com/b/bharry/archive/2010/12/07/vs-tfs-2010-sp1-beta-has-released.aspx 
Once you have downloaded the web installer, be patient as the install will take some time to download the packages and install, for me the process took around an hour from start to finish.  After successful installation you will be ask to restart your computer, now you visual studio is all set to start profiling your silverlight application using the wizard.

The Performance Wizard is very simple let us go set by step through it, open a existing silverlight project or create a new project. To launch the ‘Performance Wizard’ go to the main menu find Analyze –> Launch Performance Wizard…

image

Performance wizard page 1 of 3 should be displayed, CPU Sampling must be selected by default if not the check mark the radio button before CPU Sampling.

image
Performance wizard page 2 of 3, on this page you will find a list of projects depending on the structure of your solution. Typically for a silverlight project you will find the silverlight application and the web application in the list, select your silverlight application and click the ‘Next’ button.

image 

Performance wizard page 2 of 3, is just a summary that say’s all the information needed has been collected. Make sure on this page you have the check mark on the check box labeled as Launch profiling after the wizard finishes. When you click finish the application should open in your default browser.

image

If you are not running as administrator you might get an error saying “ Unable to open profiler driver, would you like to upgrade credentials ..“ . Just click ‘yes’  and provide admin credentials if needed.

image

Once above steps are done the Performance Explore with be populated with a structure similar to the image below. The performance wizard has created two folders  Reports and Targets.

image

Ok now lets do simple performance test,Let us create a simple application and see how performance report looks like.Create a silverlight application, In your main page add a button and on the click of the button we should have a function that does some kind of cpu intensive activity. I have simply created nested loop to keep the cpu busy for a while but you can write any code that will be cpu intensive.

  1:         private void Button_Click(object sender, RoutedEventArgs e)
  2:         {
  3:             for (int i = 0; i < 100000; i++)
  4:             {
  5:                 for (int j = 0; j < 10000; j++)
  6:                 {
  7:                 }
  8:             }
  9:         }

Now follow the steps shown above to generate profiling report using the wizard, run the project and click on the button couple of time and then close the browser. Visual studio will bring up the visual report based on the samples collected during the performance analysis. Below figure show the result of my test, one can clearly identify in the graph the spike in CPU during the first and second click.Interesting fact is Studio will automatically bring show a call tree of the method that are expensive in terms of resource. For our case the event handler Button_Click() does a expensive for loop and studio was able identify the method and display the call hierarchy.


image


Thursday, November 18, 2010

Context Menu with check mark

In Silverlight 4 it is very easy to create a context menu, basically a context menu appears on right click action and has choices depending on the state of the UI element. Silverlight toolkit has a in build context menu control, if you do not have the toolkit you will have to install it from Microsoft website. Once installed you can add context menu control to your visual studio toolbox by doing a right click on toolbox –> Choose Items…-> Silverlight Components –>select ContextMenu and press ok. Now you can drag and drop the context menu from the toolbox in your layout editor, a name space xmlns:toolkit="http://schemas.microsoft.com/winfx/2006/xaml/presentation/toolkit" should be added to the XAML and three dll’s will be added in the project references

image

In the main page XAML add the below code, here we have a text box with a context menu it has two items one has a Icon and the next item does not have a icon. Our intention is to show a check mark in front of the menu item when a user first time clicks on the menu and toggle it on consecutive clicks. To display a icon in front the toolkit has element called <MenuItem.Icon> the icon is of type content so it can be anything like a image, textbox, grid. I could have select a Image of a check mark and used it as icon but the problem is my application has numerous themes where the user can change the color of every item in UI, so in this case we will have to create different image for each an every color. Instead of Image I use a textblock that will have the ascii equivalent of the check mark and surround the textblock with a Border. To display ascii character in textblock we should use the format “&#<ascii code>;”

  1:   <Grid x:Name="LayoutRoot" Background="White">
  2:         <TextBox Text="Context Menu test" Height="200" Width="200" >
  3:             <toolkit:ContextMenuService.ContextMenu>
  4:                 <toolkit:ContextMenu>
  5:                     <toolkit:MenuItem x:Name="AlertWindow" Header="Display Window" 
  6:                                       Click="AlertWindow_Click" >
  7:                         <toolkit:MenuItem.Icon>
  8:                             <Border BorderBrush="Blue" Background="LightBlue"
  9:                                     BorderThickness=".5"  >
 10:                                 <TextBlock Text="&#8730;" FontWeight="Bold" 
 11:                                      Foreground="Green" TextAlignment="Center"/>
 12:                             </Border>
 13:                         </toolkit:MenuItem.Icon>
 14:                     </toolkit:MenuItem>
 15:                     <toolkit:MenuItem x:Name="Close" Header="Close" >
 16:                     </toolkit:MenuItem>
 17:                 </toolkit:ContextMenu>
 18:             </toolkit:ContextMenuService.ContextMenu>
 19:         </TextBox>
 20:     </Grid>

Now you can add a click event on the menu item, and in the xaml.cs add a event handler. The code shown below will basically toggle the visibility of the border.

  1:     private void AlertWindow_Click(object sender, RoutedEventArgs e)
  2:     {
  3:         Border border = ((sender as MenuItem).Icon as Border);
  4:         if(border.Visibility==Visibility.Collapsed)
  5:             border.Visibility = Visibility.Visible;
  6:         else
  7:             border.Visibility = Visibility.Collapsed;
  8:     }


The final output in the browser will look like this
image
Additional benefit of this technique is modularity and maintainability because you do not need different images for differently themed application.One can easily match the color of the context menu check mark icon with the theme of your application as the colors are stored in resources. For simplicity I will keep the theme color’s in the <UserControl.Resources> but for your application the theme location might in a resource dictionary, the final XAML should look like this .

  1:     <UserControl.Resources>
  2:         <SolidColorBrush x:Name="MenuTickBorderColor" Color="Brown"/>
  3:         <SolidColorBrush x:Name="MenuTickFillColor" Color="Yellow"/>
  4:         <SolidColorBrush x:Name="MenuTickFontColor" Color="Brown"/>
  5:     </UserControl.Resources>
  6:    
  7:     <Grid x:Name="LayoutRoot" Background="White">       
  8:         <TextBox Text="Context Menu test" Height="200" Width="200" > 
  9:             <toolkit:ContextMenuService.ContextMenu>
 10:                 <toolkit:ContextMenu>
 11:                     <toolkit:MenuItem x:Name="AlertWindow" Header="Display Window"
 12:                                       Click="AlertWindow_Click" >
 13:                         <toolkit:MenuItem.Icon>
 14:                             <Border BorderBrush="{StaticResource MenuTickBorderColor}"
 15:                                     Background="{StaticResource MenuTickFillColor}"
 16:                                     BorderThickness=".5"  >
 17:                                 <TextBlock Text="&#8730;" FontWeight="Bold"
 18:                                            Foreground="{StaticResource MenuTickFontColor}"
 19:                                            TextAlignment="Center"    />
 20:                             </Border>
 21:                         </toolkit:MenuItem.Icon>
 22:                     </toolkit:MenuItem>
 23:                     <toolkit:MenuItem x:Name="Close" Header="Close" >                      
 24:                     </toolkit:MenuItem>
 25:                 </toolkit:ContextMenu>
 26:             </toolkit:ContextMenuService.ContextMenu>
 27:         </TextBox> 
 28:     </Grid>

Now one can change the three SolidColorBrush in resources to change color of the icon on the context menu. Here I have shown three differently themed icons of the context menu.

  1:    <UserControl.Resources>
  2:         <SolidColorBrush x:Name="MenuTickBorderColor" Color="Blue"/>
  3:         <SolidColorBrush x:Name="MenuTickFillColor" Color="LightBlue"/>
  4:         <SolidColorBrush x:Name="MenuTickFontColor" Color="Green"/>
  5:     </UserControl.Resources>

image

  1:     <UserControl.Resources>
  2:         <SolidColorBrush x:Name="MenuTickBorderColor" Color="Red"/>
  3:         <SolidColorBrush x:Name="MenuTickFillColor" Color="LightPink"/>
  4:         <SolidColorBrush x:Name="MenuTickFontColor" Color="Red"/>
  5:     </UserControl.Resources>

image

  1:    <UserControl.Resources>
  2:         <SolidColorBrush x:Name="MenuTickBorderColor" Color="Brown"/>
  3:         <SolidColorBrush x:Name="MenuTickFillColor" Color="Yellow"/>
  4:         <SolidColorBrush x:Name="MenuTickFontColor" Color="Brown"/>
  5:     </UserControl.Resources>

image

The above technique might not be suitable for every scenario and using images might be more easy. I am not a big fan of writing code in backend rather I prefer to follow MVVM pattern where ever possible, In future post I will write about how to connect context menu using the view model